How to draw a skull that looks like bone
How to draw a skull, in twelve steps built on one idea: the braincase is a ball and the face hangs off the front of it. Get that and the rest is placement. Every step below has its own drawing.
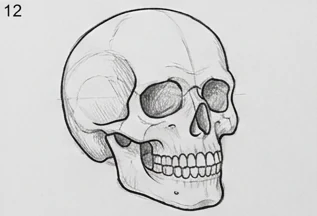
A skull is drawn in every art class and is still easy to get subtly wrong, because everybody knows what one looks like and almost nobody has looked at one closely. The errors are always the same: too narrow, eye sockets too small, and a jaw hinge in the wrong place.
How to draw a skull: the twelve steps
1. A ball and a hanging box
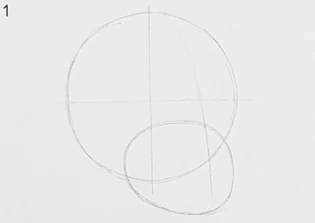
A circle for the cranium, and below and in front of it a rough box for the jaw and teeth. A skull is not an egg: the braincase is a sphere and the face hangs off the front of it, which is the single fact that makes skulls hard to draw from memory.
2. Centre line and brow line
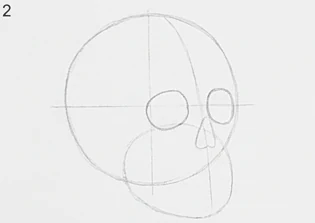
Draw a vertical line down the middle of the face and a horizontal one across the eye level, both curving with the surface of the ball. These two lines do all the work of turning a flat circle into a head that faces a direction.
3. Set the eye sockets
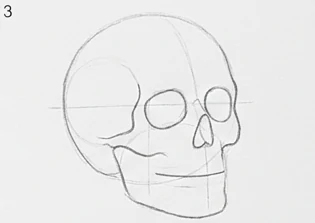
Two large openings sitting on the brow line, wider than you expect and angled slightly down towards the nose. Sockets are not circles; they are rounded squares with a heavy top edge. Leave a gap of about one socket width between them.
4. The nasal opening
An upside-down heart, or a rounded triangle, below and between the sockets. It stops well short of where a nose would end on a living face, which is why a skull looks so much shorter in the face than a portrait does.
5. Cheekbone and temple
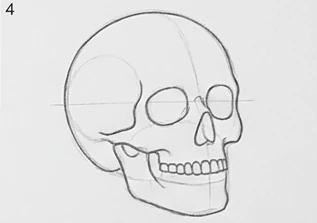
A curve running from the outer edge of each socket back towards the ear. Above it, the temple hollows in slightly. This is the line that gives a skull its width, and leaving it out is why beginners’ skulls look narrow.
6. Find the jaw hinge
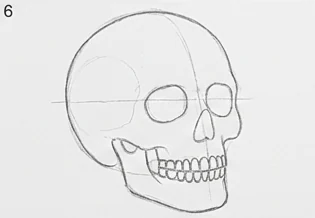
The jaw pivots just in front of the ear, higher than most people place it. Mark the hinge, then draw the ramus rising up to it from the back of the jaw. Everything about the mouth is easier once the hinge is in the right place.
7. The dental arch
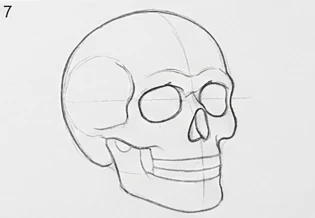
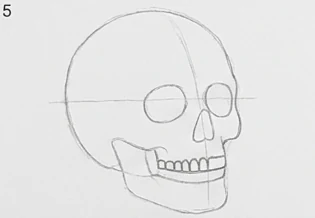
A curved band for the upper teeth and another for the lower, following the box from step one. Draw the band before the individual teeth: a row of teeth drawn one at a time will drift, and the drift shows.
8. Divide the teeth
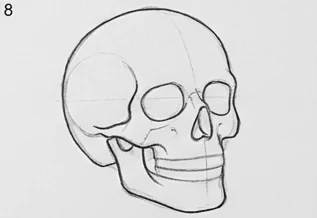
Now split the bands. Flat wide incisors at the front, a slightly pointed canine at each corner, then squarer molars running back. Keep the divisions light - teeth drawn with heavy lines look like a comb.
9. Brow ridge and the orbit rim
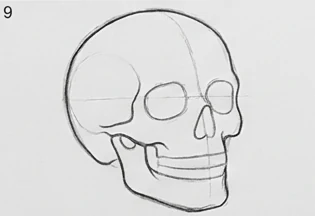
Thicken the top edge of each socket and carry it across the top of the nose. This ridge is what casts the shadow that makes skulls look grim, and it is a solid piece of bone rather than a line.
10. The cranium’s own lines
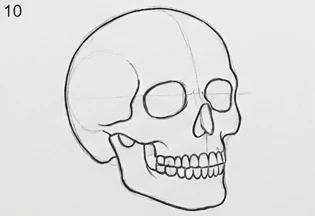
Add the suture running back over the top of the skull and the slight flattening above the temple. Small marks, but they stop the braincase reading as a smooth ball.
11. Commit to the outline
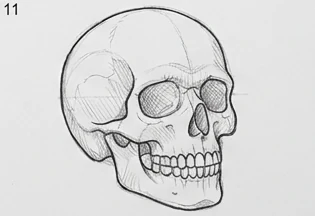
Darken the silhouette first - cranium, cheek, jaw - then the socket rims, then the teeth. Keeping that order means the heaviest lines land on the parts that carry the shape.
12. Shade the hollows
The sockets, the nasal opening and under the cheekbone are the three places that go dark. Everything else stays pale. A skull is mostly light, and it is the depth of those three holes that sells it.
Why the ball-and-box start matters
A skull drawn as a single outline will drift. The cranium is close to a sphere and the facial bones are a mass attached to the front of it, and if those two are not separate objects in your head they will not be separate in the drawing.
It is also what lets you turn the skull. Once it is a ball with a box on the front, a three-quarter view is just the same two shapes rotated - not a completely new drawing.
The three proportions people miss
The eye sockets are bigger than they look in photographs, and they sit at the halfway point of the whole head rather than high up. The skull is wider at the temples than the jaw is at the chin. And the teeth occupy far less vertical space than a living mouth suggests.
Check those three before you darken anything, because all three are cheap to fix at step six and expensive at step eleven.
Finished? Print it
Compare the available sizes and prices before ordering. Free UK delivery is included in every price.
Good to know
What shape do you start a skull with?
A circle for the braincase and a rough box hanging off the front of it for the jaw and teeth. Drawing the outline in one go is what makes skulls come out too narrow.
Where do the eye sockets go on a skull?
On the horizontal centre line of the whole head, including the cranium - roughly halfway down. They are also larger and squarer than most people draw them.
How do I shade a skull?
Only three areas go genuinely dark: the eye sockets, the nasal opening and the hollow under the cheekbone. Keep everything else pale; a skull is a light object.
Is a skull good practice for drawing faces?
Yes, because every landmark on a face sits on a piece of bone you have just drawn. The brow ridge, the cheekbone and the jaw hinge are the three that matter most.