How to draw an elf, from the head ball up
How to draw an elf, head and shoulders, in twelve steps. Each one has its own drawing showing exactly what it adds. The ear angle in step three is the single thing that decides whether the finished face reads as elven or as a costume.
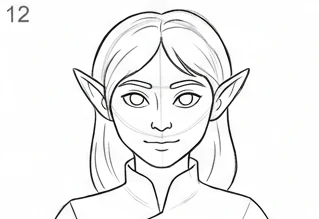
An elf face is a human face with a few deliberate exaggerations, which means the drawing has to be right before it can be stylised. The features below are laid in on a normal head, and only the ears, the chin and the eye shape depart from it.
How to draw an elf: the twelve steps
1. A ball and a chin
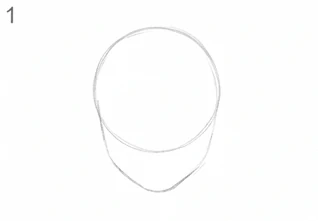
Circle for the cranium, then a shallow V beneath it for the jaw and chin. An elf face is usually drawn narrower and longer in the chin than a human one, so keep the V a little sharper than feels right.
2. Centre line and eye line
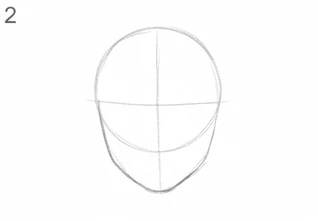
A vertical through the middle of the face and a horizontal across it, both curving to follow the ball. The eye line sits halfway down the whole head, including the cranium - not halfway down the face, which is where most people put it.
3. Ears, and their angle
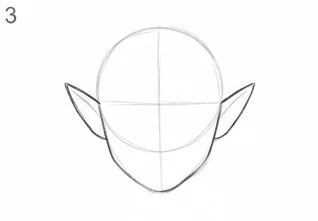
Long pointed ears rising from about the eye line and sweeping back and up. The angle is what makes them read as elven rather than as a costume: too horizontal and they look comic, too vertical and they look painful.
4. Block in the eyes
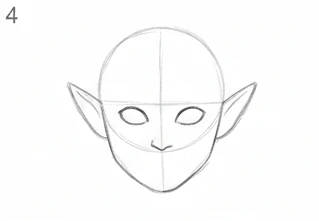
Two almond shapes on the eye line, one eye width apart. Elf eyes are usually drawn larger and tilted up slightly at the outer corner. Draw the outline only, and leave the pupils and lashes until later.
5. Nose and mouth
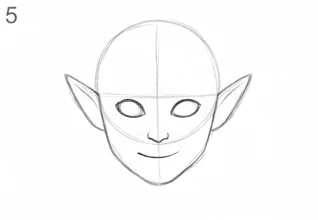
A small nose, indicated with two nostril marks and a soft line down one side rather than a full outline. The mouth sits between the nose and the chin, closer to the nose than the halfway point.
6. The hair mass
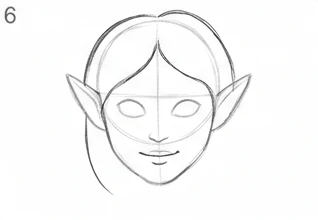
Draw hair as one large shape, not as strands. Work out where the parting is and let the mass fall from there, keeping it clear of the skull ball so it has thickness. Hair drawn strand by strand always ends up flat.
7. Neck and shoulders
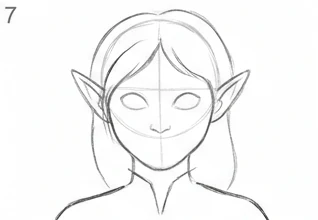
A neck narrower than the head but not thin, and shoulders sloping away from it. This is where a head-and-shoulders drawing either becomes a person or stays a floating face.
8. Brows and eyelids
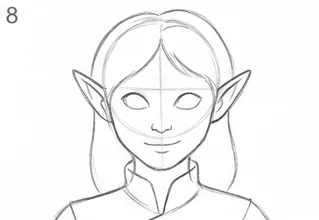
A brow line above each eye following the skull’s curve, and a lid line just inside the top of each almond. The lid is what makes the eye sit in a socket rather than on the surface of the face.
9. Pupils, and where they look
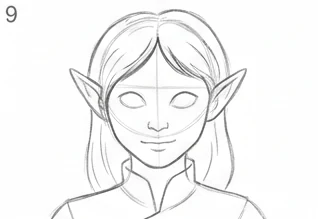
Place the iris and pupil, then put a small highlight in both, in the same corner of each. The highlight is the difference between an eye that is open and an eye that is alive.
10. Detail the hair
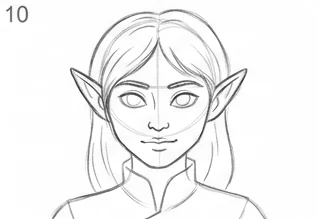
Now, inside the mass you drew in step six, add a few strand groups following the direction of the fall. A few is enough. The mass carries the shape and the strands only describe its surface.
11. Collar and clothing
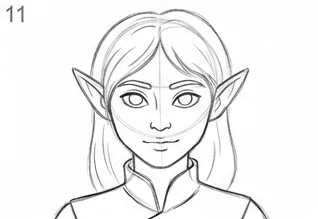
A simple collar line and the edge of a garment. Keep it plain: an elaborate costume drawn now will fight the face, and the face is the reason anybody is looking.
12. Darken, then erase
Go over the lines you are keeping, working from the eyes outwards, then rub out the centre line and the eye line. Check the eyes are level by turning the paper upside down - errors you cannot see the right way up jump out immediately.
The eye line is lower than you think
On almost every beginner portrait the eyes are too high, because we think of the face as the whole head and put the eyes in the middle of the face. The eyes actually sit halfway down the entire head, cranium included, and the top half is mostly skull.
If a drawing looks wrong and you cannot say why, check this before anything else. It is behind a great many portraits that feel wrong without an obvious cause.
Hair as a mass, never as strands
Hair drawn strand by strand comes out flat every time, because strands describe a surface and a surface needs a volume underneath it. Draw the volume first: one shape, clear of the skull, with a parting that tells you which way it falls.
Only then add a handful of strand groups, and fewer than you want to. The mass is doing the work.
Finished? Print it
Compare the available sizes and prices before ordering. Free UK delivery is included in every price.
Good to know
How do you draw elf ears?
Long and pointed, rising from about the eye line and sweeping back and up. The angle matters more than the length: too horizontal reads as comic, too vertical looks uncomfortable.
Where do the eyes go on a face?
Halfway down the whole head, counting the cranium, not halfway down the face. Almost every beginner places them too high.
What makes a face look elven rather than human?
A narrower, longer chin, eyes tilted up slightly at the outer corner, and the ears. Everything else is drawn as an ordinary head.
How do I stop hair looking flat?
Draw it as one mass with thickness, clear of the skull, before adding any strands - then add far fewer strands than you think you need.